


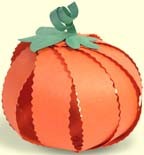
Paper Strip Pumpkin
Materials:
- 1 (9 by 12 inch) sheet orange construction paper
- Scissors (fancy edge scissors work well)
- a sharp pencil
- 2 round head brass fasteners for each pumpkin
- 1 thin strip of green construction paper for stem and vine
- 1 small piece of green construction paper for the leaves
- white glue
Directions:
- Cut five strips of orange paper, about 1" wide by 12" long.
- Fold one strip in half to find the middle (or measure 6 inches from the side).
- Poke a small hole through the center of all five strips with the sharpened pencil.
- Poke a small hole at each end of the strips about 1/2 inch from the end.
- Poke a fastener through the center holes in the strips and flatten the prongs of the fastener to hold the strips in place.
- Fan the strips out in a circle.
- Curve the strips up, one by one, and poke the second fastener through the hole at the end of each strip, going in order around the pumpkin.
- Once you have all the strips on the second fastener, then flatten the prongs.
- Tear or cut out a couple of green leaves.
- Curl the strip of green paper around the pencil. Hold until it curls.
- Glue the strip on the top of the pumpkin for the vine/stem.
- Glue the leaves to the top of the pumpkin.
Source:
adapted from www.azlearningbug.com , 2008.